.png)
Ideas of How to Organize Wrapping Supplies: Find Out What Worked for Me
- Glory Creative

- Nov 26, 2020
- 6 min read
Updated: Mar 31, 2021
I just love gift wrapping and making packages look decorative, but storing and keeping up with the wrapping supplies has always been a challenge until I decided to get serious about organizing all my gift wrapping supplies.

Challenge
I don’t know if you are like me or not, but I have struggled for years trying to organize wrapping paper and all the frills which go with it. My wrapping spot has usually been on our bedroom floor, away from the kids and peeking eyes who might see their presents before the perspective occasion.
I usually have everything ALL over the floor and what a mess it is! I typically lose the tape or scissors and ink pen for writing names on tags. It has been quite the adventure. It is a disorganized mess to say the least.
For the past couple of years, I moved the operation upstairs in my husband’s music room. He has had to endure my mess in his space and has been very good natured about it.
Inspiration on Pinterest
This year after looking at Pinterest boards, I got the bright idea to create a wrapping/craft room. Well, it is really a closet, but it is a large walk in closet. I decided to overhaul the closet that previously served as two of my kids closet. They have all moved out and I could commandeer the closet for my mastermind project! (For the purpose of this topic, I am only going to discuss the wrapping paper organization.) I will write a separate article on the craft organization and storage.
Cleaning Out and Sorting the Space
The first step was cleaning out the current closet.
Boy was that fun going through the closet full of stuff! Of course I am being sarcastic. Emptying an overflowing closet can be pretty overwhelming. We were already in the process of cleaning out our garage and shed. But, by keeping focused and having a plan of what space to work on, we were determined. We did not do this in one fail swoop. We did it over about a month cleaning out the others spaces at the same time. If you focus on just this area, it would definitely take less time.

Once the closet was emptied and the contents moved to another location, sold, or donated, it was time to plan the project. I had looked at wrapping paper holders, but honestly, I did not want to spend the money for them. (There are many great products on the market). My husband told me he would build me a wrapping paper holder. I had found ideas looking through Pinterest which really inspired the plan.
Al, my husband asked me how many rolls of paper I had so he would know how big to make the rack. I really didn’t know, and I was sure I needed to order new paper for Christmas. So,
I had him get the boxes of Christmas paraphernalia out of the attic. As I dug through them, 5 or 6 long boxes, I started sorting and counting. Well, I had A LOT more paper than I originally thought. Over 40 rolls of Christmas paper and over 30 rolls of “other” occasion paper. I found wrapping paper which had never been opened. This was like going shopping!
Your probably wondering how I had accumulated so much paper. We had a system in our house while the kids were growing up. Each child was able to pick the wrapping paper they wanted their gifts wrapped in for Christmas. It made Christmas a lot easier because each person in the house had one kind of wrapping paper which was different form the others, so it was easily identifiable. The kids loved going to look under the tree and count how many presents they had in their designated paper. It was a lot of fun.
Thus, we NOW have a lot of left over paper. It took years to accumulate all those rolls. Needless to say, I did not order wrapping paper this year and do not have to get any supplies. The only item I have bought for my wrapping operation is a tape dispenser which clips to the table. I am determined NOT to lose my tape this year! I am mastering that problem once and for all. I purchased it at Staples. You can also purchase at Amazon and eBay. They come in aqua, red, black and yellow.

Organization Supplies
The first step was to make faux marble shelves to spiff them up and make them sturdier for holding small items. You can get the tact paper in many designs and colors at retail stores like Walmart and Lowes. I used foam board for the base. I watched a few YouTube videos to learn the best method and installed them with Al's help.

I ordered baskets from Amazon to sort my "all occasion" gift bags. These came with labels which I haven't gotten around to marking.

The rack was built, painted and installed for the rolls of wrapping paper. I separated them by Christmas or "other occasion" and placed rolls in combinations by either color, pattern or occasion. It makes it easy to find.
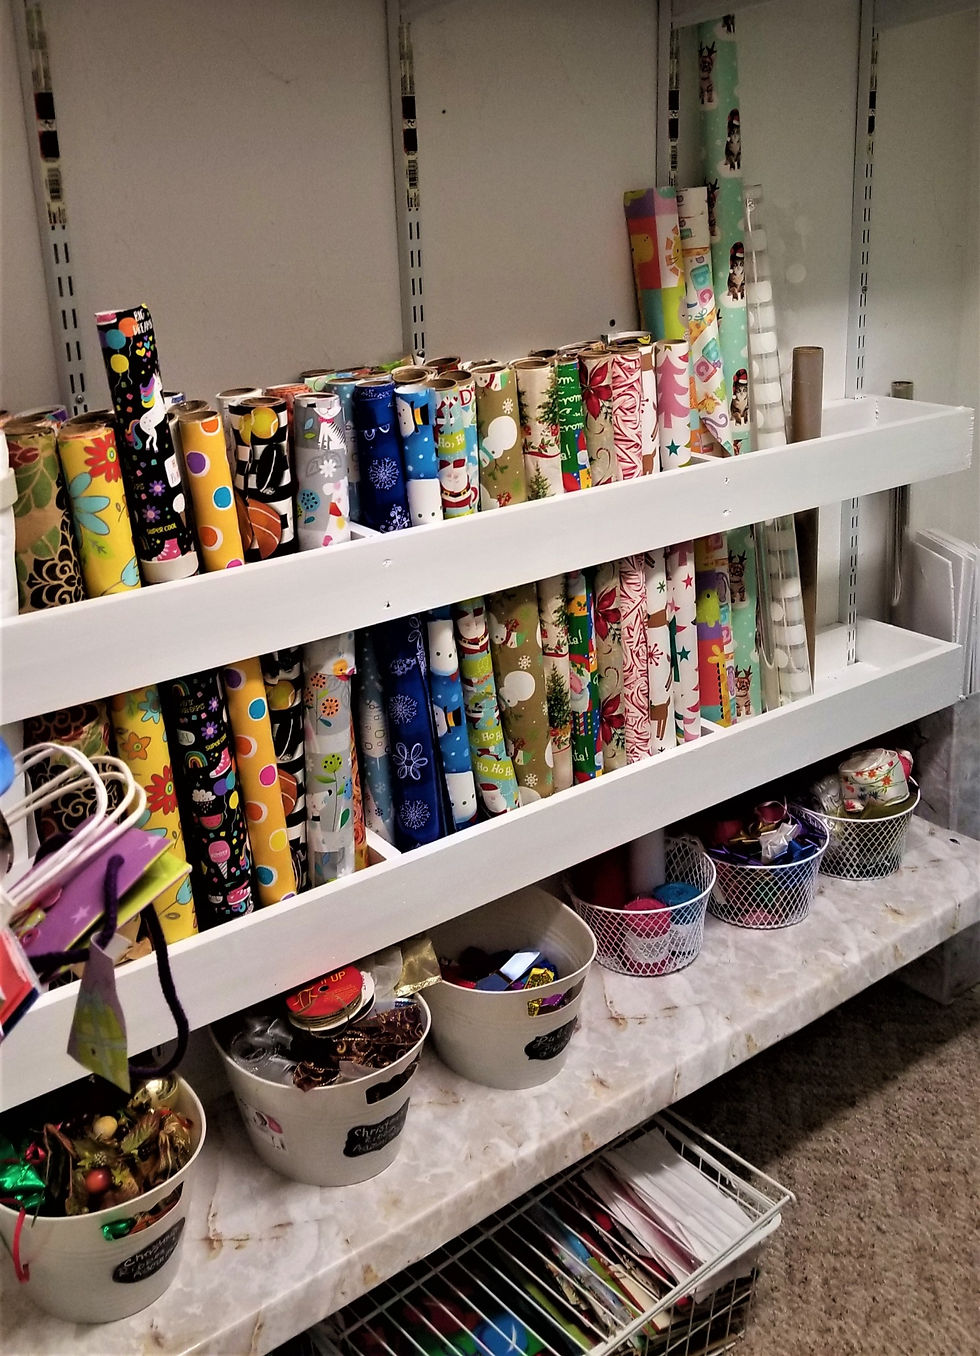
I bought white mesh baskets and plastic bins at Dollar Tree for ribbon and bows. Each is organized by type of bow or ribbon
The bins and baskets were labeled with Chalk Board labels from Amazon. I ordered two kinds; stick on and tie on. (The tie on labels came with a few stick on labels, too.)

The labels came in three sizes, with a marker and cleaning cloth included. Amazon

Repurposing Supplies Found in the House
To make use of “crumpled tissue paper” “and scrapes of wrapping paper”, I found baskets for storage. If I need to stuff something, there is tissue paper, I don’t mind using and not messing up new sheets. Those can be reserved for gift bags and presents. I have never known how to store scrapes of paper and haven't wanted to waste them. It comes in handy for wrapping small items.
Now, I just go into the closet, grab the basket and pull out what I need without digging through boxes.


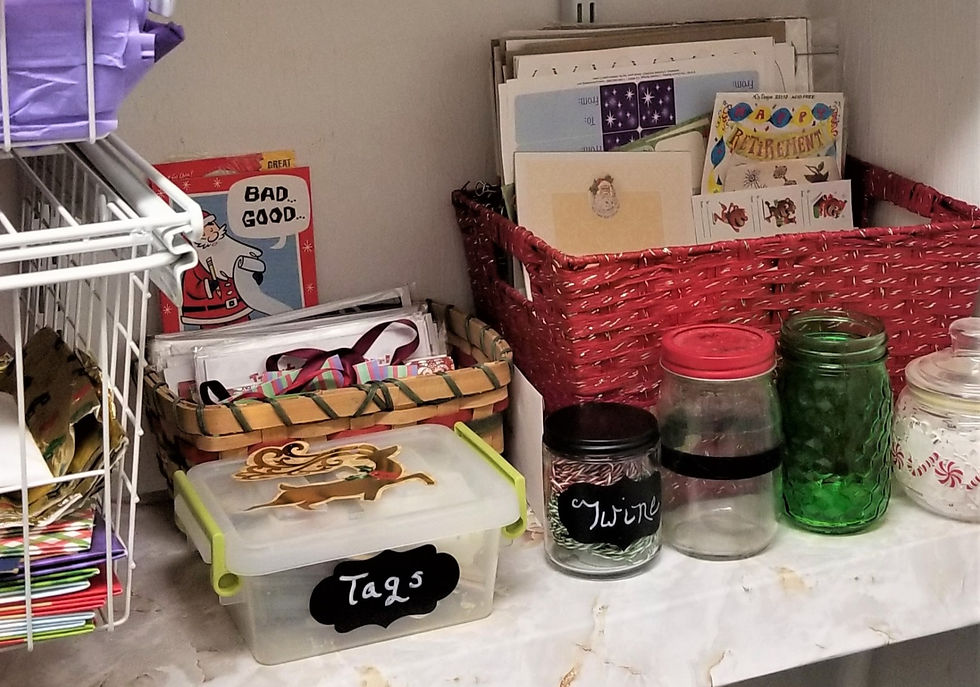
Other basket were used for “loot bags”, storing Christmas cards, stickers and stick on tags. I found a pretty gold basket in my closet to store extra tape. A blue rolling cart and step ladder were in my garage. The rolling cart folds for easy storage and I can use it to roll supplies to another room if I desire. A dollar store marble colored trash can is great for easy to access use.


A small plastic container stores card tags. I place a former "reindeer tag" on top for decoration and to easily identify the contents. I believe this was from Dollar General. It was another item from my closet.

Another basket holds money envelops. and another stick on tags.
We had a Rolling plastic storage container (which I spray painted green) and wire closet drawers. We used the green storage container for organizing various sizes of boxes and the wire drawers for mini boxes and tissue paper.
I was able to dig up some odds and ends, red and green jars to store twine for tags. A few of the jars are still empty. I am sure something will end up in them.


Where to wrap
This year, I will not be on the floor. I pulled out a portable table from a cabinet in the garage. Funny how we forget we have other items stored away which can be useful. It folds up and stores vertically.
I will set this up in the wrapping closet and be within arms reach of all my supplies.
Wow why didn't I think of this sooner?

Final Thoughts
I hope you have been able to find inspiration by something you have seen on my board, or though sharing my journey to get here.
I am excited for Christmas wrapping this year, as well as for the "other occasions" coming up! Getting organized is SUCH a time saver. Now, instead of hunting down supplies and losing them, I have more time and energy for creativity! Something which has previously been left behind.
* Last Tip
Last year, i never got around to sending Christmas cards. This year, I had everything organized; cards, labels and sticker. I printed out my address labels and all I had to handwrite was our Signature. They are ready to be mailed, with Christmas stamps and all.
Comments
Let us know in the comments section, if you try any of the suggestions and what has worked for you. This is a place to share ideas and help inspire others!
Happy Wrapping,
Melanie


Comments